Technology Demonstration
This section guides you through a demonstration of a Hyperlocal Context Server. Using an RTLS is compelling because it automates the collection of data of a business’s physical operations, facilitating the derivation of insights necessary for continuous improvement.
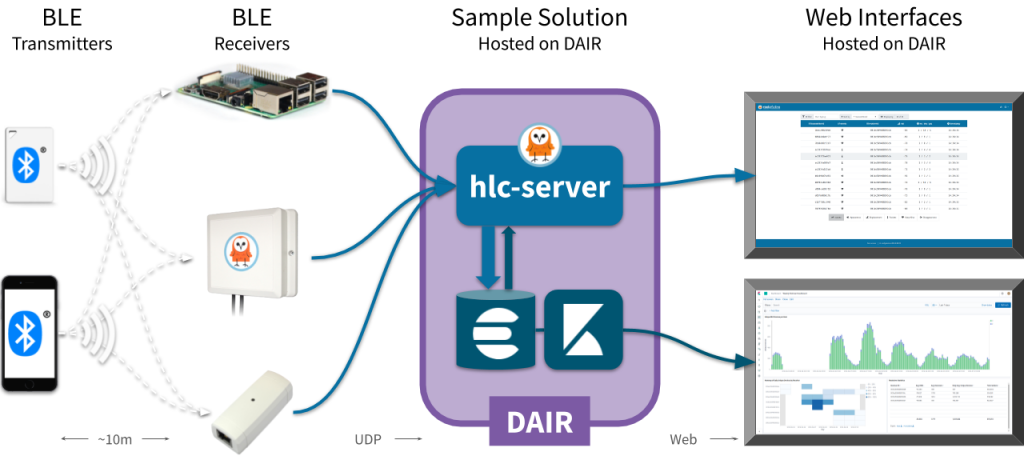
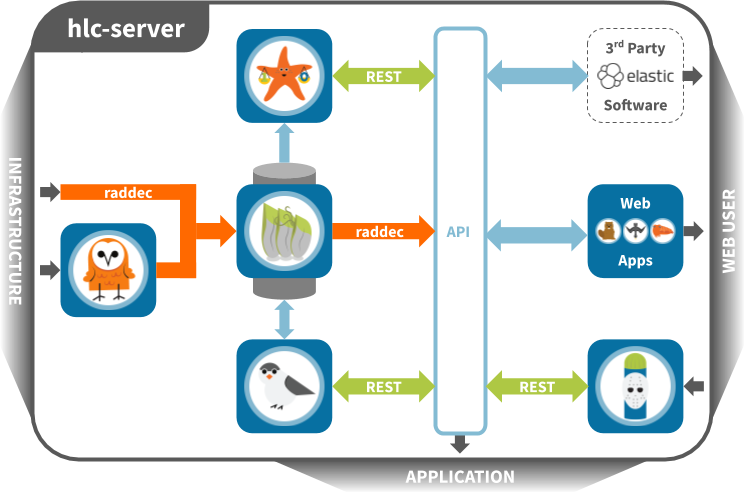
The demonstration will illustrate the deployment of the RTLS software, database, and analytics suite in the cloud using DAIR.
How to Deploy and Configure
The assumptions or prerequisite steps before deploying the Sample Solution require that you have set up:
- a security group rule that allows HTTP (port 80) and HTTPS (port 443) connections into VMs spun up in the DAIR Cloud from all external sources (0.0.0.0/0).
- a security group rule that allows Kibana (5601) and HLC (port 3001) connections into VMs spun up in the DAIR Cloud from all external sources (0.0.0.0/0).
- a security group that allows you to SSH (TCP port 22) into VMs that are spun up in the DAIR Cloud from the IP with which you are accessing the VM
- your SSH private key to log in to your DAIR BoosterPack VMs

Adding inbound security group rules in AWS
Learn more about Security Groups in AWS
Ready to launch?
1. Ensure that you are logged in to your DAIR AWS account with instructions provided to you by the DAIR team.
2. Click DEPLOY to launch the BoosterPack using the AWS CloudFormation stack.
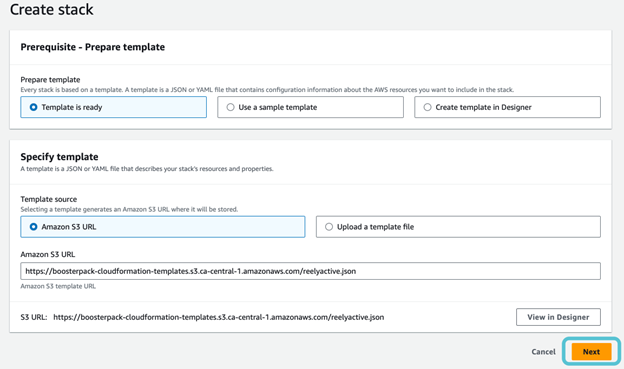
3. Click Next to go to CloudFormation step 2 and fill out the parameter configuration form. In the InstanceName provide unique instance names for your web application.
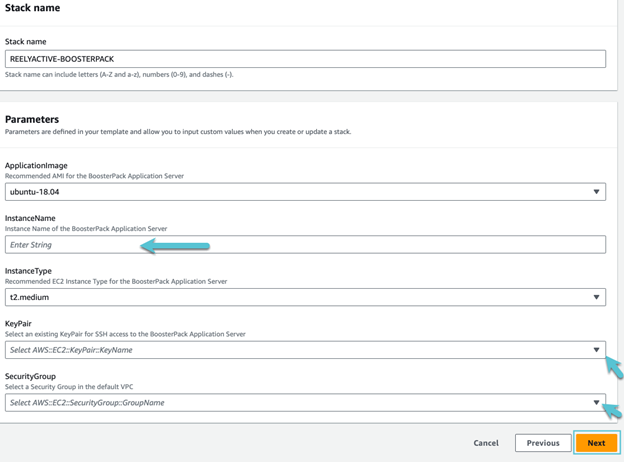
4. Once you are done, click Next to go to CloudFormation step 3. This section is for configuring additional/advanced options which are not required in our use case.
5. Click Next at the bottom of the page to skip step 3 and get to the final CloudFormation step 4.
The final section allows you to review existing BoosterPack configurations and provides options for making configuration changes, using the Edit button, if needed. Once satisfied with the existing configuration, click Submit at the bottom of the page to deploy the BoosterPack.
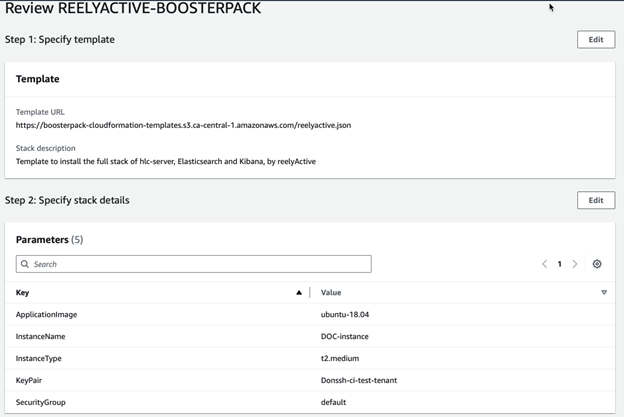
The BoosterPack deployment will start by creating 1 new instance, and the deployment automation will follow. However, you can only monitor the status of the AWS instances through the “Events” and “Resources” tab of the CloudFormation page and you will need to subsequently log in to the instance with your ssh key and the IP available on the Outputs tab.
- Select the Infrastructure menu
- Select Network option
- Click on the Security Groups tab
- Click on the Name of the Security Group for AWS cloud to edit the rules
Troubleshooting steps:
Login to your cloud instance with SSH and run these commands:
Check status of the deployment:
$ cat /var/log/boosterpack.log
Check the status of services that should be running:
$ sudo systemctl status elasticsearch.service
$ sudo systemctl status kibana.service
Now, you can point your web browser to the instance IP address, port 3001 to access the HLC web application. For example, http://15.156.83.137:3001 as shown below:
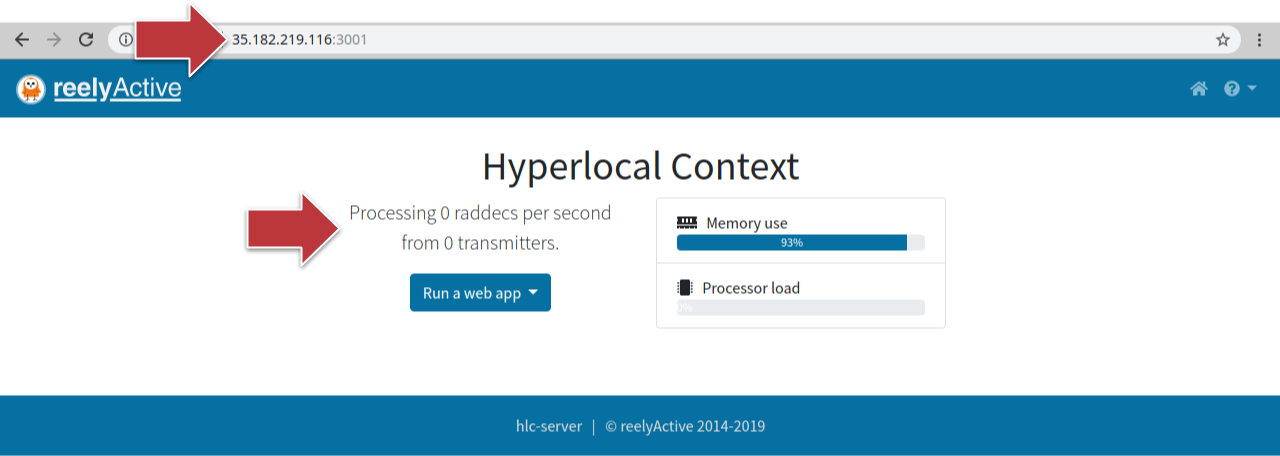
A landing page similar to the one shown above should be displayed. It is normal that the software is processing no data as there is no RTLS hardware forwarding data until it has been configured.
Forwarding Data to the Sample Solution Instance
The hlc-server software is listening for UDP traffic on port 50001 containing (binary) encoded raddec (RADio DECoding) packets. There are several ways to forward raddecs to the instance, using Parento Anywhere Apps, with purpose-built hardware as we offer here, with off-the-shelf hardware such as a Raspberry Pi or simply through software.
Forwarding Data with a Raspberry Pi
The Raspberry Pi 3, Pi 4 and its contemporaries include an on-board BLE radio and can be configured to run reelyActive open source software by following this tutorial.
With the Raspberry Pi configured you can follow these instructions to set up the Onboard Radio.
The hlc-server software will automatically listen for ambient Bluetooth Low Energy data from its onboard radio provided an instance of barnowl-hci is running and forwarding the data. Follow the instructions below to install and run automatically each time the Pi boots.
Install barnowl-hci
From the same terminal connected to the Pi via SSH, complete the following:
- Create the reelyActive folder and then cd to the folder like this:
$ mkdir ~/reelyActive
$ cd ~/reelyActive
- Clone the barnowl-hci repository with the command:
$ git clone https://github.com/reelyactive/barnowl-hci.git
- Change to the barnowl-hci folder with the command
$ cd barnowl-hci
- Install all package dependencies from npm with the command:
$ npm install this takes about 1 min
Assign radio privileges
Allow Node.js programs the privilege to initiate scans with the command:
$ sudo setcap cap_net_raw+eip $(eval readlink -f `which node`)
Run Barnowl
Run barnowl-hci once to confirm that it can listen for ambient data:
- npm start will output radio decoding (raddecs) to the console for quick-and-dirty testing
- npm run forwarder will forward raddecs to your Instance setup by cloud formation.
To instead forward UDP raddecs to a remote Pareto Anywhere instance, start this script with the command:
npm run forwarder xxx.xxx.xxx.xxx
where xxx.xxx.xxx.xxx is the IP address of the remote instance.
Enter Ctrl+C to stop barnowl.
Enable the barnowl-hci-forwarder as a service
1. Configure systemd to run the barnowl-hci-forwarder service by updating the working directory and adding the IP to the end of the NPM command.
All three changes needed are highlighted in bold:
$ vi units/barnowl-hci-forwarder-pi.service
change the following data in the file:
[Unit]
Description=Bluetooth HCI scan forwarder by reelyActive
After=network.target
[Service]
WorkingDirectory=/home/dmccullo/reelyActive/barnowl-hci
ExecStart=/usr/bin/npm run forwarder 15.156.83.137
Restart=on-failure
User=dmccullo
[Install]
WantedBy=multi-user.target
Save with Esc followed by :wq!
2. Copy the unit file to the systemd system folder with the command:
$ sudo cp units/barnowl-hci-forwarder-pi.service /lib/systemd/system
3. Enable the barnowl-hci-forwarder service with the command:
$ sudo systemctl enable barnowl-hci-forwarder-pi.service
4. Start the barnowl-hci-forwarder service with the command:
$ sudo systemctl start barnowl-hci-forwarder-pi.service
The Pi will now automatically and continuously scan for ambient devices each time it boots, forwarding the data to Pareto Anywhere.
If necessary, it is possible to disable the service with the command:
$ sudo systemctl disable barnowl-hci-forwarder-pi.service.
There you go, you have a Barnowl Reading Bluetooth data in your space and sending it to your instance
Forwarding Data in Software
It is possible to generate and forward a raddec packet with the following Node.js code.
const dgram = require('dgram');
const raddec = Buffer.from('10001702aabbccddeeff013a0101001bc509408100000b', 'hex');
const client = dgram.createSocket('udp4');
client.send(raddec, 0, raddec.length, 50001, '35.182.219.116'); // Set IP address!
Paste the code above into a file called forward.js. Then from the command line run node forward. A single raddec will be sent via UDP to the Sample Solution instance.
Observing Data in Kibana
Data can be observed in Kibana under two conditions:
1. At least one radio decoding (raddec) packet has been forwarded to the Sample Solution instance (see above).
2. Kibana is explicitly configured to be accessible on the web (by default it is only accessible on the localhost).
Configure Kibana for Remote Access
Kibana can be configured for remote access by adding/editing one line of its configuration as follows:
- ssh into the Sample Solution instance (ex: ssh [email protected]) or use the web console available in the Console tab of the Instance View.
- Open the kibana.yml file for editing with the command sudo vi /etc/kibana/kibana.yml
- Add the following line to the bottom of the file: server.host: “0.0.0.0”
- Save the file
- Restart the Kibana with the command: sudo systemctl restart kibana.service
It should now be possible to browse to Kibana on port 5601 of the Sample Solution instance (ex: 35.182.219.116:5601).
Create the raddec index pattern in Kibana
In Kibana, click on the Discover icon from the left bar to be prompted to create an index pattern. Then:
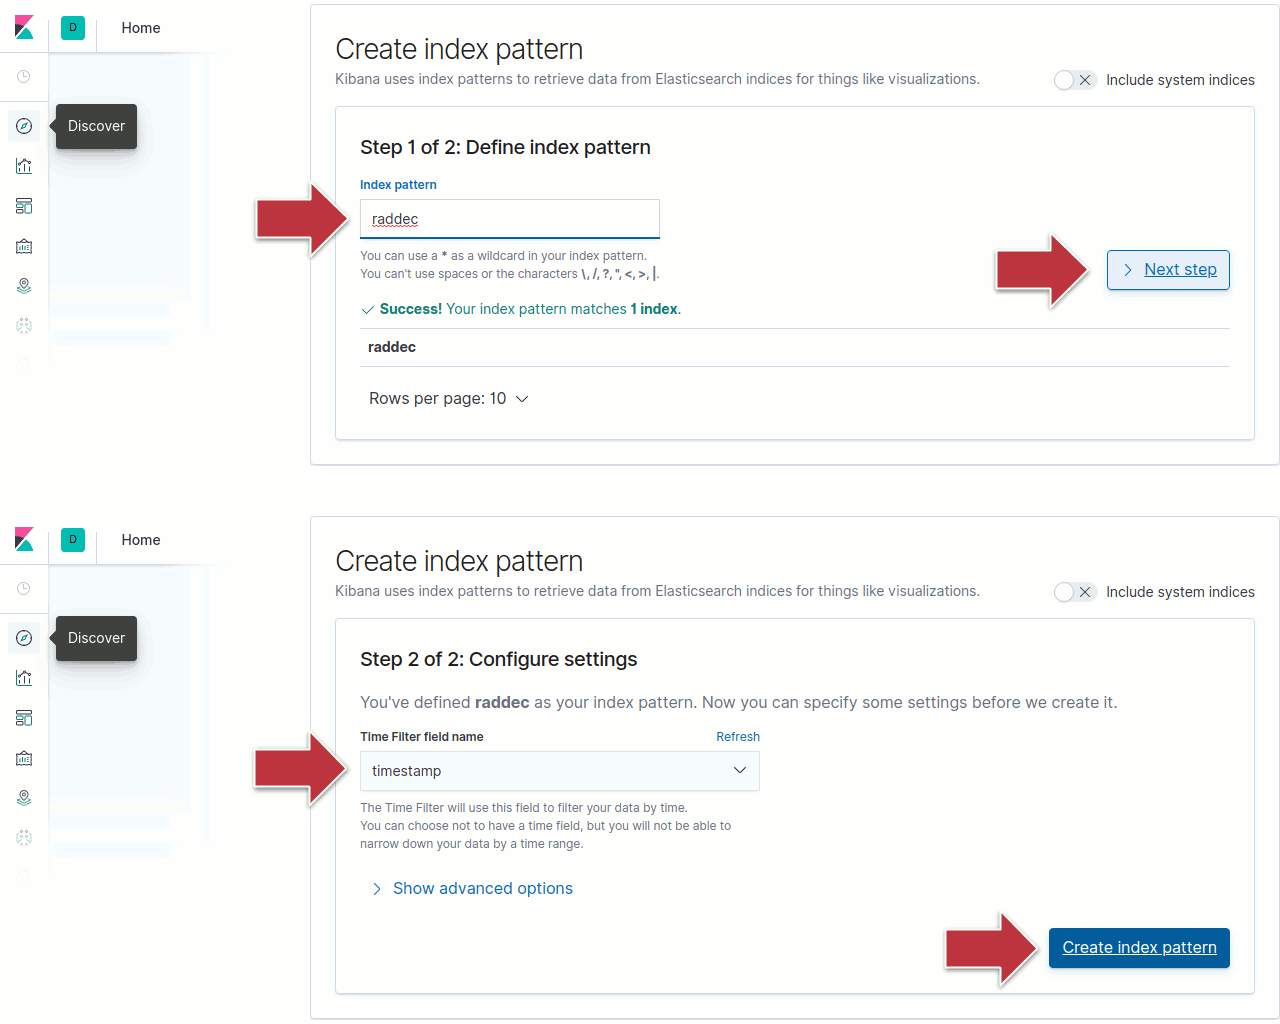
- type raddec in the index pattern box and click Next Step to continue
- select timestamp in the Time Filter field name dropdown and click Create index pattern to continue
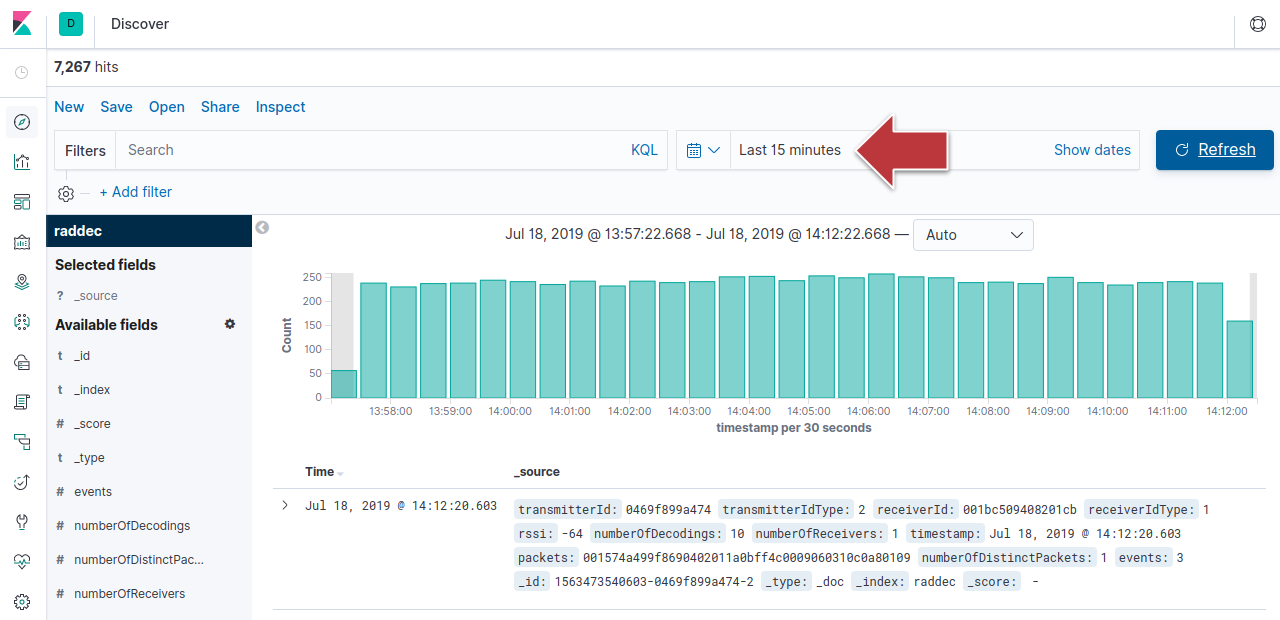
- click on the Discover icon again and observe raddec data (if necessary, adjust the time range to a period where raddec data is present)
Create Reports and Visualisations in Kibana
See the Kibana integration overview tutorials for examples of reports and visualisations.
Termination
Delete the instance in the DAIR Cloud to terminate the solution and release any resources it consumes. To do this, return to the CloudFormation stacks page and delete the stack corresponding to the BoosterPack. More information about deleting a CloudFormation stack can be found here.


