The DAIR Program is longer accepting applications for cloud resources, but access to BoosterPacks and their resources remains available. BoosterPacks will be maintained and supported until January 17, 2025.
After January 17, 2025:
Screenshots should remain accurate, however where you are instructed to login to your DAIR account in AWS, you will be required to login to a personal AWS account.
Links to AWS CloudFormation scripts for the automated deployment of each sample application should remain intact and functional.
Links to GitHub repositories for downloading BoosterPack source code will remain valid as they are owned and sustained by the BoosterPack Builder (original creators of the open-source sample applications).
This Sample Solution demonstrates how we used Kubernetes, Apache Airflow, MySQL, FastAPI, Apache Kafka and React.js at Intelius Analytics to create automated data pipelines by developing an integrated framework from open source libraries.
Problem Statement
It’s hard to find a low-cost, end-to-end automated data pipeline framework that is scalable and that can be customized for a broad range of business needs. Most enterprise data management problems can be solved using a generalized 3-4 tier architecture. However, finding a baseline or prototype of microservices architecture to download as a framework is difficult.
Traditionally, organizations must hire architects (data or enterprise) to design and develop an architecture and then have a development team (with specific skill sets) develop the services independently. The baseline framework itself usually takes several months to build and organizations spend thousands of dollars on hiring resources to start development from the ground up. Organizations can use this solution as a baseline and avoid building ADP frameworks from scratch.
While this specific Sample Solution automates the processes of ingesting, processing, storing, and presenting stock market and news data, it can be used as a generalized approach to most common enterprise problems. Most automated data pipelines follow the same design pattern for data management projects. This solution will give organizations a head start by implementing the solution as a foundation and then customizing it according to their business use case.
Potential use cases of this Sample Solution:
IoT Analytics in different industries: From sensor data to insights, this BoosterPack will provide the foundation for edge computing and back-office processing.
Robotics real-time data processing and integration with the back office
Fraud Detection, real-time recommendations, and voice-driven analytics (Personal Assistants) can be implemented with the proposed micro-services architecture.
Any business that is looking to implement real-time or near real-time analytics to data in motion or at rest will benefit from this cloud-agnostic architecture.
Sample Solution Overview Diagram
The diagram below illustrates the structure of the Sample Solution.
Automated Data Pipelines (ADP) Sample Solution Architecture
Component Descriptions
Significant components of the Sample Solution are summarized below. Tools and technologies used in this solution and presented in the diagram above – Kubernetes, Apache Airflow, Apache Kafka, FastAPI, and MySQL – are introduced in this BoosterPack’s Flight Plan.
Component
Summary
Ingestion Service
Independently deployable service developed in Python that enables ingestion of data from external services and delivering the data to the Kafka messaging service. This Sample Solution contains two pipelines (Directed Acyclic Graphs or DAGs) on a deployed Airflow instance for ingesting:
1. stock market data every one minute during normal market hours [9:30 a.m. – 4 p.m. ET], and 2. news information every five minutes for five 5 US stock exchange tickers [AAL, AAPL, AMD, MSFT, and TSLA].
Stock market data is ingested using a free market data API from Finnhib.io and news data is ingested using a free Ticker News API from polygon.io.
Processing Service
Independently deployable service developed in Python that enables data processing that was ingested earlier. Allows users to augment the data processing by adding functionalities like adapting to the new schema, data cleaning, wrangling, and integrating with other sources. This Sample Solution contains two pipelines on the same Airflow instance as ingestion service for processing:
1. ingested market data sent using Kafka messages, and 2. ingested news data saved in a MySQL database table.
In the first pipeline, EMA9 [Exponential Moving Average of 9 days] technical indicator is calculated and saved in the MySQL database to demonstrate a typical processing procedure. In the second pipeline, news information is sent to news sentiment prediction API and the resulting sentiment information is saved in the MySQL database.
Analytics Service
Independently deployable service developed in Python that enables the development of simple to complex analytical models depending on the business use case.
The Sample Solution uses a pre-trained news sentiment prediction model to predict whether each of the ingested news items will have positive, neutral, or negative impact on its related stock ticker. The sentiment is defined based on the numeric influence scores that are predicted by this NLP-based model. This prediction functionality is exposed as an API using a FAST API tool and is called by the news data processing pipeline.
Data Services
The solution uses MySQL as the open-source data storage tool. By default, a database – called “automated-data-pipelines” – preloaded with three tables that are created during the deployment of this Sample Solution.
The solution also uses the open-source messaging platform Apache Kafka for hot path storage – typically used for streaming and low latency (real-time) data requirements. One topic (“DAIR-dataingestion-1min-topic”) gets created in this package which contains the tickers’ market price data updates every minute.
Middle-Tier (Backend) Service
The output of the system can be retrieved using the APIs created in this service, which represents an intermediary layer between the presentation and data services.
In this solution, two APIs are created for accessing processed market and news data using FastAPI. While these APIs are supposed to be called by frontend services, they can be accessed using Swagger UI or Redoc interface. For more information, check this page from FastAPI documentation.
Frontend (Presentation) Service
This service provides an interface that enables users to access the outputs of the system. The application in this layer can be a dashboard, web pages, mobile app, or other frontend tools.
In this solution, a web page gets deployed that presents the ticker’s market price data using a candlestick chart and recent news information, including their sentiment, after selecting a ticker and a date. This page was developed using React.js technology.
Kafdrop
Kafdrop is an open-source web UI for viewing Kafka brokers, topics, consumers, producers, and browsing Kafka messages.
How to Deploy and Configure
If you’re a DAIR participant, you can deploy the Sample Solution on a new instance by following the instructions below.
You have set up a security group that allows you to SSH (TCP port 22) into VMs that are spun up in the DAIR Cloud from the IP you are accessing the VM.
You must be able to create a Linux VM in the DAIR Cloud and log into it via SSH before continuing.
Important: The KAT BoosterPack doesn’t need to be installed before the ADP BoosterPack. The ADP BoosterPack contains the installation script needed to install a single-node microK8s Kubernetes cluster and tools such as Kubernetes Dashboard, NGINX Ingress Controller, and Helm package manager.
Get API Keys from Finnhub.io and Polygon.io
To ingest real-time data for stock market prices and news, register for a free subscription from Finnhub.io and polygon.io. Both provide a free subscription to retrieve the stock market prices and news data feeds (with limits) required for this BoosterPack. This Sample Solution is designed to function normally with the limited number of API calls under the free subscription model.
After registering for your free subscriptions, copy the API keys (tokens) generated for each data source. You’ll need to enter these keys during the deployment of the ADP solution:
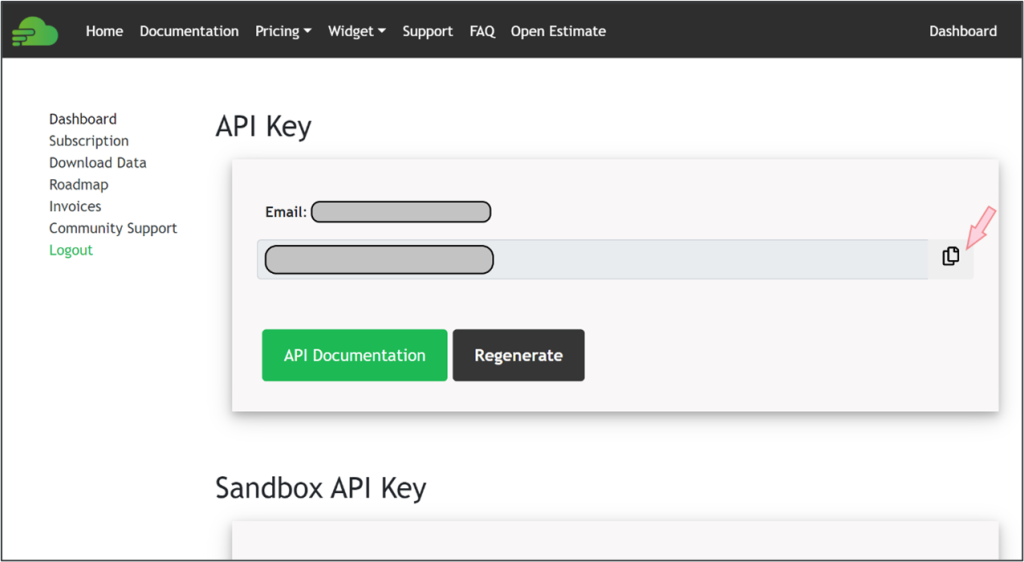
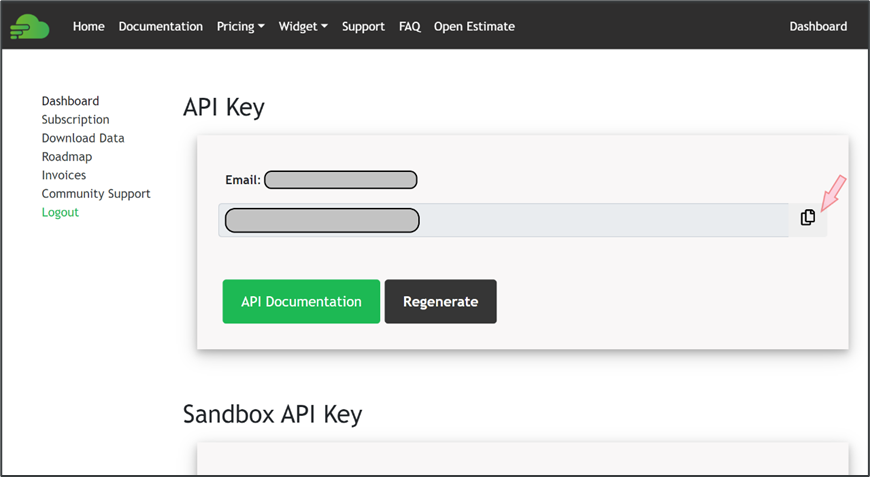
For finnhub.io, after logging on to the site, you can find and copy your free API key on the main dashboard, as seen below:
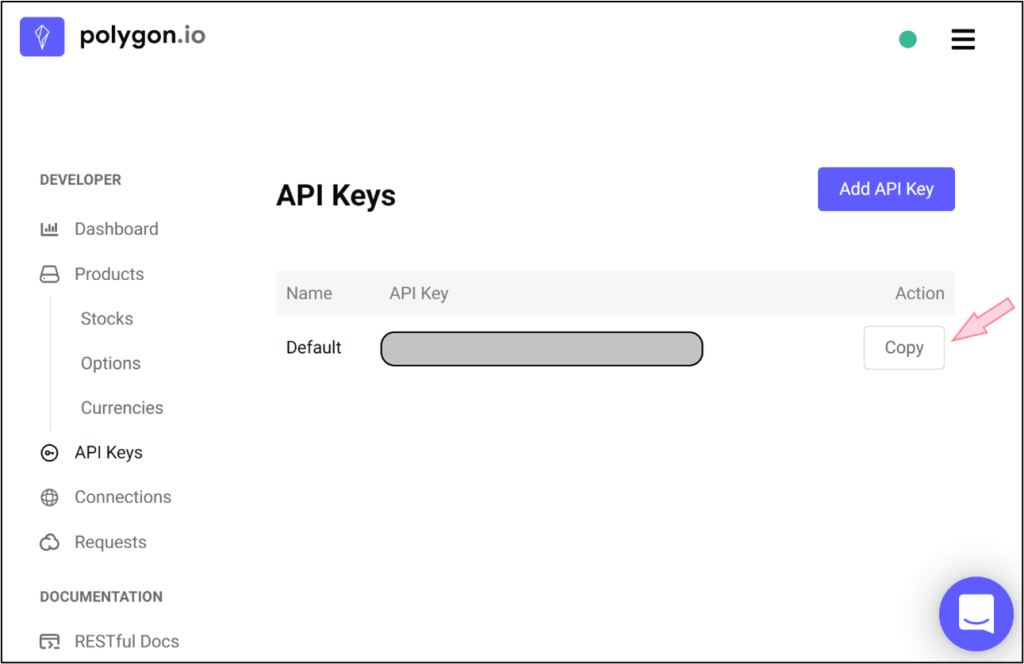
For polygon.io, after logging in to the site, you need to navigate to the API Keys page and click Add API Key. You can then copy the free API key, as shown below:
You have set up a security group that allows you to SSH (TCP port 22) into VMs that are spun up in the DAIR Cloud from the IP you are accessing the VM.
You must be able to create a Linux VM in the DAIR Cloud and log into it via SSH before continuing.
Important: The KAT BoosterPack doesn’t need to be installed before the ADP BoosterPack. The ADP BoosterPack contains the installation script needed to install a single-node microK8s Kubernetes cluster and tools such as Kubernetes Dashboard, NGINX Ingress Controller, and Helm package manager.
Get API Keys from Finnhub.io and Polygon.io
To ingest real-time data for stock market prices and news, register for a free subscription from finnhub.io and polygon.io. Both provide a free subscription to retrieve the stock market prices and news data feeds (with limits) required for this BoosterPack. This Sample Solution is designed to function normally with the limited number of API calls under the free subscription model.
After registering for your free subscriptions, copy the API keys (tokens) generated for each data source. You’ll need to enter these keys during the deployment of the ADP solution:
For finnhub.io, after logging on to the site, you can find and copy your free API key on the main dashboard, as seen below:
For polygon.io, after logging in to the site, you need to navigate to the API Keys page and click Add API Key. You can then copy the free API key, as shown below:
Deploying ADP Sample Solution in DAIR cloud
Log in to your DAIR AWS account with instructions provided to you by the DAIR team.
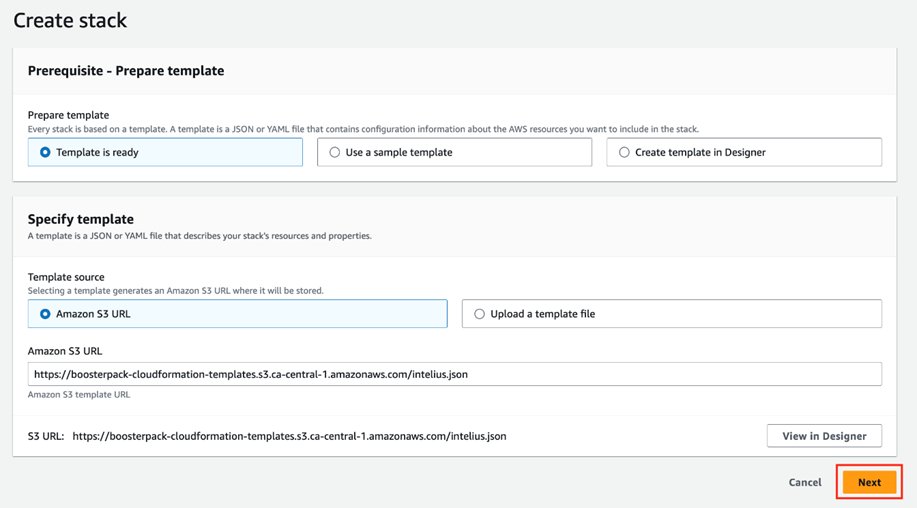
From a different browser window, go to the DAIR BoosterPack catalogue page, navigate to the Intelius (Automated Data Pipeline) section and click DEPLOY to launch the BoosterPack using AWS CloudFormation stack.
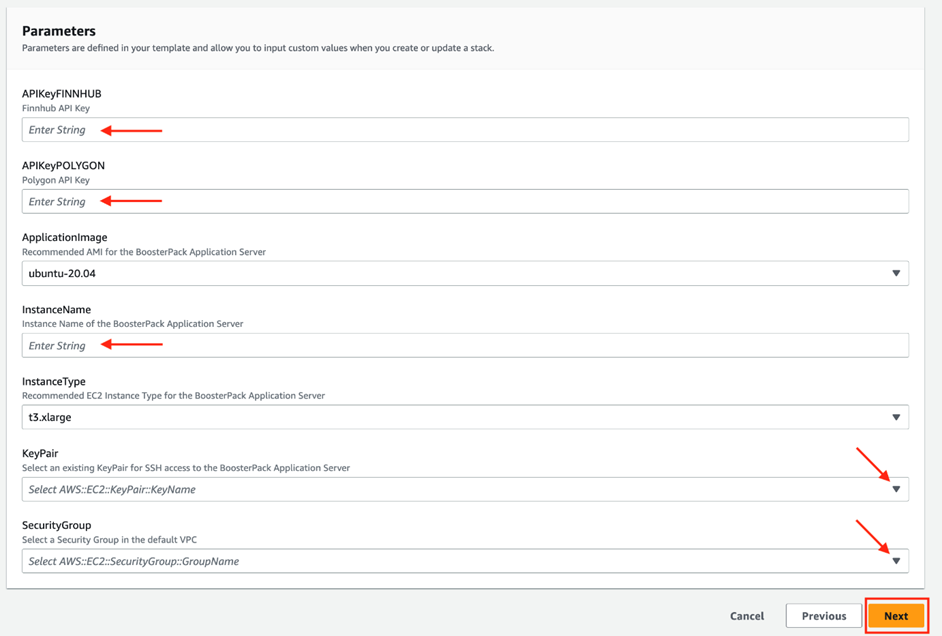
Click Next to go to CloudFormation step 2 and fill out the parameter configuration form. Ensure that you enter the API keys copied from Finnhub.io and polygon.io free subscriptions in the “APIKeyFINNHUB” and “APIKeyPOLYGON” fields respectively. In the “InstanceName” field, type in a unique instance name for your application server and then complete the rest of the form using the drop-down options. Please note that other parameters (such as “ApplicationImage” and “InstanceType”) are pre-configured and cannot be modified.
Once you are done, click NEXT to go to CloudFormation step 3. This section is for configuring additional/advanced options which are not required in our use case. Click Next at the bottom of the page to skip step 3 and get to the final CloudFormation, step 4.
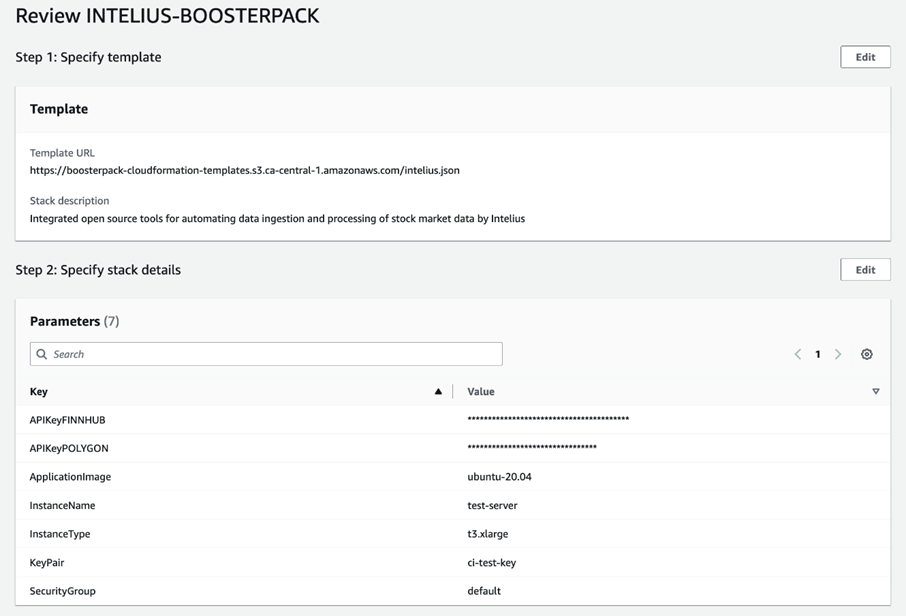
The final section allows you to review existing BoosterPack configurations and provides options for making configuration changes, using the Edit button, if needed. Once satisfied with the existing configuration, click “Submit” at the bottom of the page to deploy the BoosterPack.
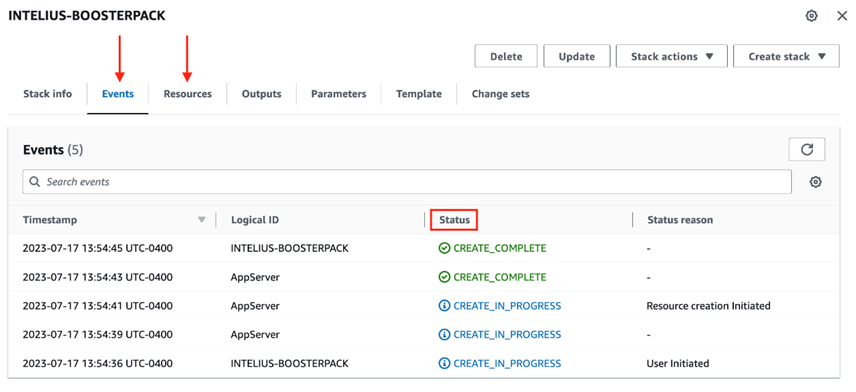
The BoosterPack deployment will start by creating a new instance followed by the deployment automation. Please note, you can only monitor the status of the AWS instance through the “Events” and “Resources” tab of the CloudFormation page and you will need to subsequently log in to the application server to confirm the deployment automation status.
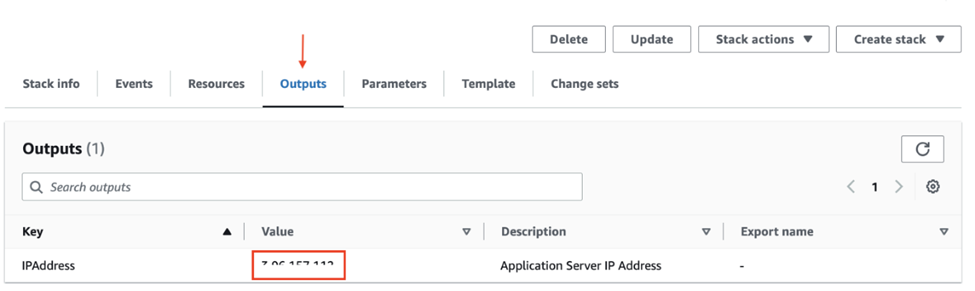
Also, be sure to record the IP address value found under the “Outputs” tab of the BoosterPack CloudFormation page. This is the external IP of the BoosterPack instance. You will need this IP address to access the web interfaces of the sample application or to log in to the server using SSH.
From a shell/terminal that has SSH enabled, log in to the application server with the following SSH command:
ssh -i key_file.pem ubuntu@Public_IP
Replace “key_file” with the private key of the SSH key pair selected in the parameter configuration form and replace “Public_IP” with the IP Address value obtained from the CloudFormation output.
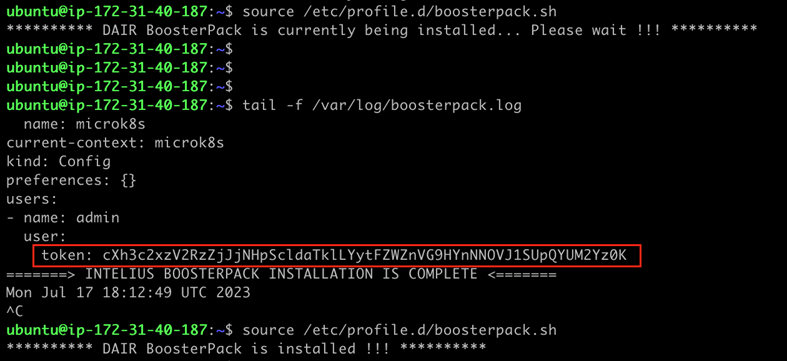
Once successfully logged in to the application server, you can monitor the status of the deployment automation script with the following commands:
source /etc/profile.d/boosterpack.sh
tail -f /var/log/boosterpack.log
Copy the token at the end of the BoosterPack install log (highlighted in the image above). This token will be required later when logging in to the Kubernetes dashboard. And you can also obtain this token from the BoosterPack application server using the following command:
microk8s config
Before going further, you must add an inbound rule to your default security group selected during the CloudFormation parameter configuration, to permit access from your local machine (SOURCE) to the deployed applications in the TCP port range of 30000-32768.
See the example rule below.
Tip: your local machine’s IP can easily be determined by entering “whatsmyip” in a Google search and noting the resulting public IP.
Technology Demonstration
This section provides an application demonstration to automate ingesting, processing, storing, and presenting stock market data with relevant news articles analyzed by a pre-trained news sentiment prediction model.
Kubernetes Dashboard
The services and applications in this solution install on a single-node microK8s Kubernetes cluster based on the KAT BoosterPack. After installation in the cluster, the Kubernetes dashboard also gets installed – similar to the KAT BoosterPack. The configuration file for installation of the Kubernetes dashboard is copied in the ADP source code. The full BoosterPack deployment, including the automation script, can take about 10 to 15 minutes. The main steps to access it are explained below – refer to the ReadMe file in the Github KAT documentation for more details:
As explained in the “How to Deploy” section in the KAT Sample Solution, you need to “tunnel from localhost:8080 on your PC to localhost:80 on the BoosterPack application server via its external host IP using your terminal or Putty tool.”
As previously described, “key_file” is the private key of the SSH key pair selected during the CloudFormation parameter configuration and “Public_IP” is the public IP address obtained from the CloudFormation output.
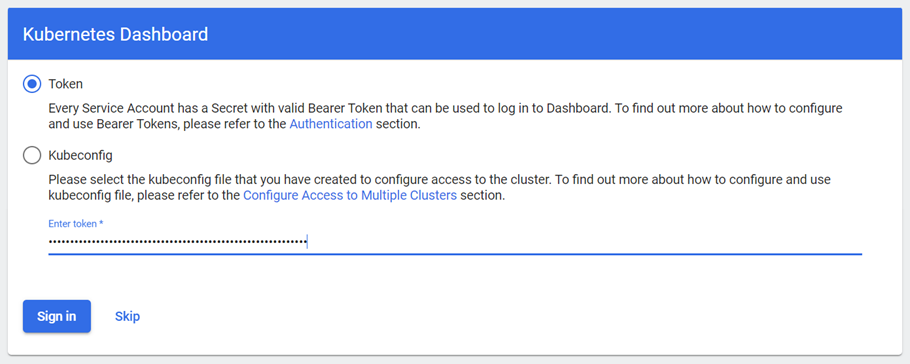
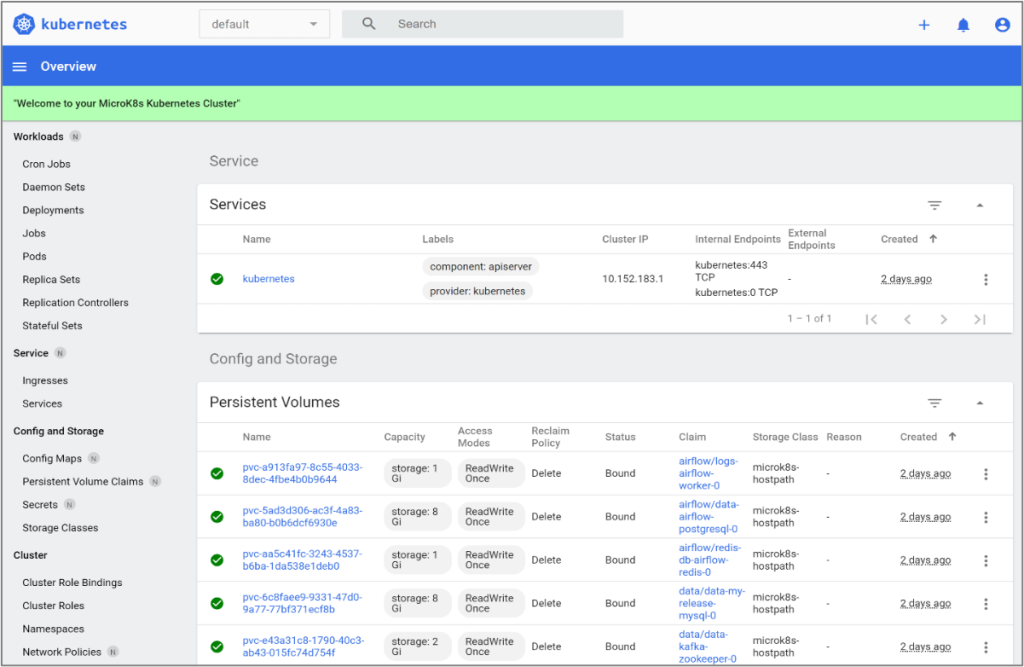
Note: Remember to execute the SSH command with the tunneling argument before you attempt logging in to the Kubernetes dashboard with the token. You can refer to Kubernetes documentation to learn about all the features in this dashboard. A successful login will result in the Kubernetes dashboard screen as shown below.
Data Pipelines in Apache Airflow
The Airflow application is the most important element of this solution to manage and execute data pipelines. The Kubernetes service that exposes the Airflow user interface is named “airflow-webserver”. It can be accessed externally using this URL format:
http://{EXTERNAL_HOST_IP}:{NODEPORT}
The PUBLIC_IP is the public IP of the BoosterPack application server retrieved from the CloudFormation output.
The value for NODEPORT is a random port number in the range of 30000-32768, to find it:
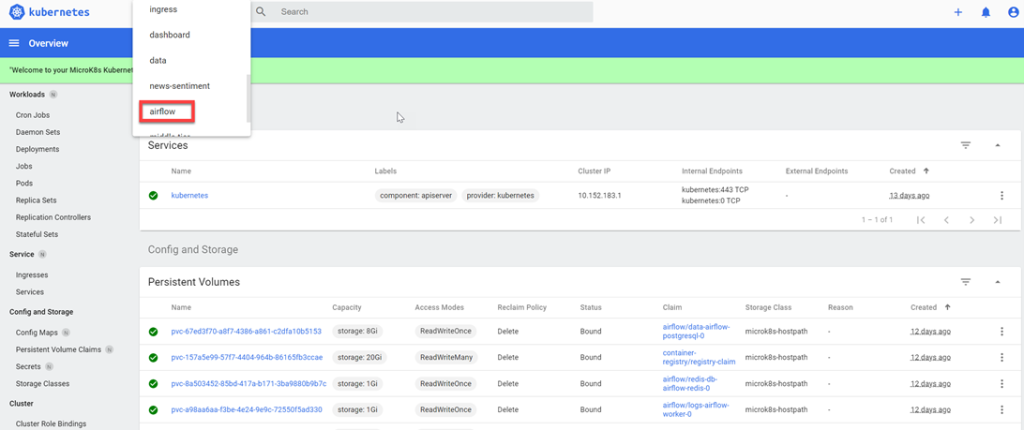
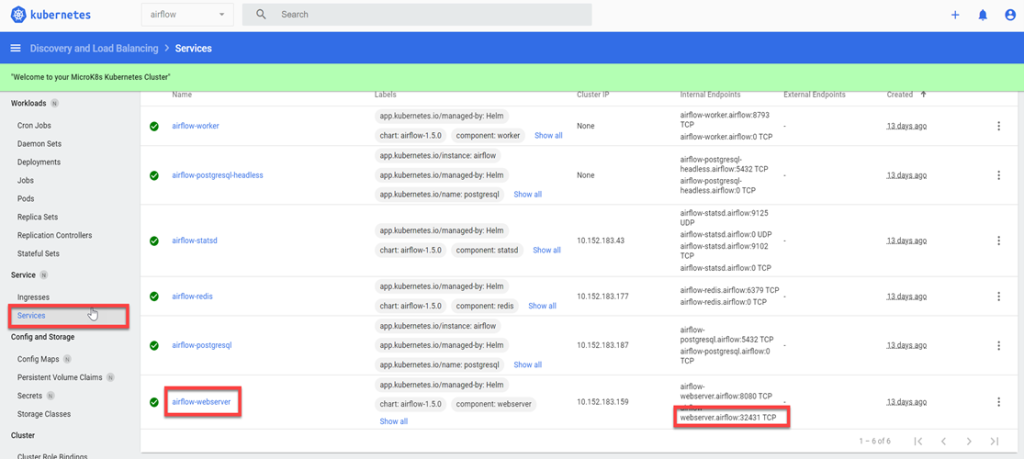
Open the Kubernetes dashboard.
Select airflow from the combo box on top of the page (scroll down the list to find it).
Select Services from the left menu bar and locate airflow-webserver from the list of services. The specified port number in the second “Internal Endpoint” is the NODEPORT value to populate the URL.
Navigate to your instances’ URL (e.g., http://3.97.56.244:32431/ ) and login using the following default credentials:
username: admin
password: admin
Tip: We strongly recommend you change this password in the “Admin” section of this UI during your first session.
Note: Except for Kubernetes dashboard, you don’t need to execute the SSH command for the Airflow Web UI or the other web interfaces which have been deployed as part of this BoosterPack.
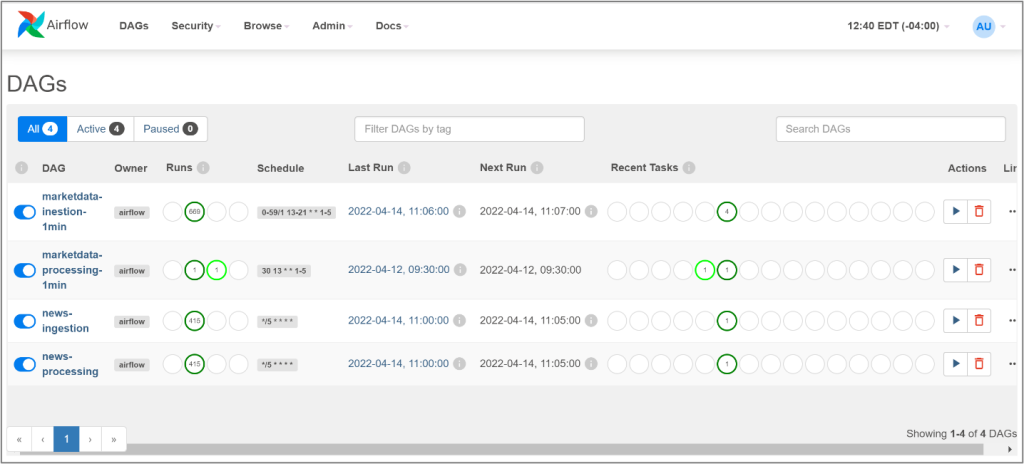
After successfully logging in to the Airflow web application, you will see a page like the one below showing the four data pipelines included with this Sample Solution.
You can see the status of each DAG, its DAG runs, and its tasks in the main page. You can access more features if you click on each DAG and navigate to additional pages like the one below, which shows a tree view of your DAG runs and their tasks.
This UI provide several features to manage your deployed Airflow instance. For a quick overview of the UI, read this from the Airflow official documentation.
Updating Finnhub and polygon API keys
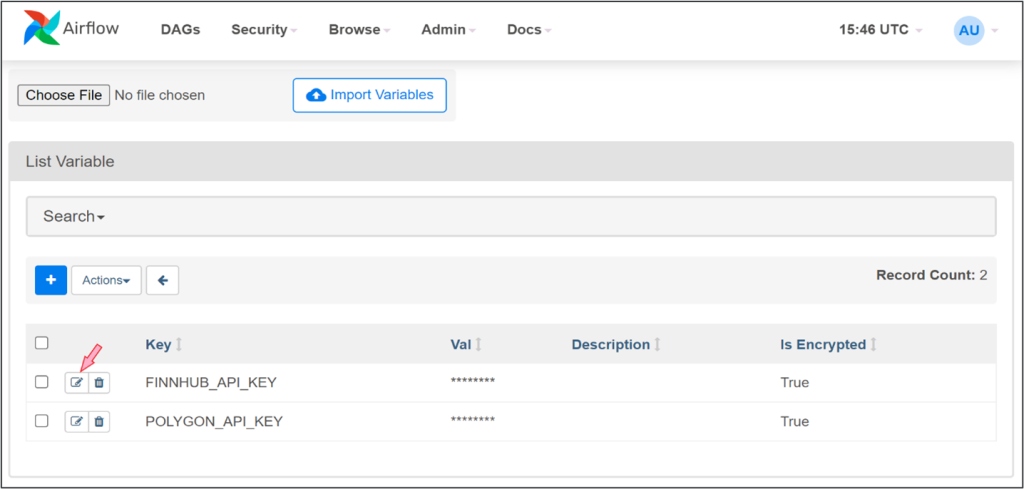
API keys entered during deployment of the BoosterPack are saved as Airflow variables. These variables can be managed by navigating to the Admin > Variables page in the Airflow UI.
To update the API keys after upgrading your subscription plan with these data providers, you can edit the values of these variables on this page, as shown in the image below.
Note: Remember that the keys (POLYGON_API_KEY and FINNHUB_API_KEY) should not be changed unless you have changed to another subscription or upgraded to a paid subscription.
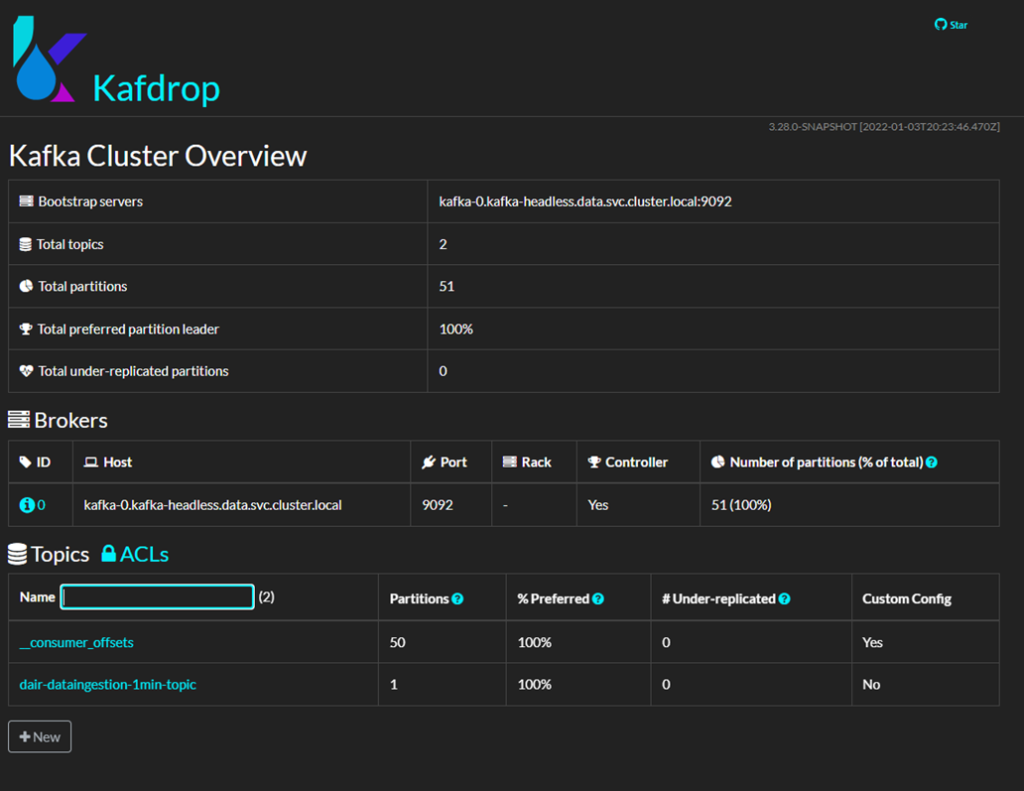
Kafdrop as a Web UI for Apache Kafka
While there are several ways to monitor and manage Kafka servers, we used Kafdrop as an open source Web UI. In this application, the “dair-dataingestion-1min-topic” Kafka topic serves as the intermediary between the ingestion and processing pipelines for market candlestick data. For monitoring and debugging purposes, you can check the time and content of these messages by clicking on the topic title in the home page, as shown below, and then click View Messages.
Kafdrop also provides features for managing and viewing Kafka servers and topics parameters, which can be useful in advanced use cases.
The Kafdrop web application is accessible from this URL: http://{EXTERNAL_HOST_IP}:30900
MySQL as the Solution’s Data Storage
During the ADP solution installation, a single instance MySQL preloaded with the solution database (automated_data_pipelines) and three tables will install on the Kubernetes cluster.
To connect to this database using your terminal, follow the steps in this readme file after connecting to your VM’s SSH server.
If you prefer to use a desktop application such as MySQL Workbench, connect to your VM’s SSH server first and tunnel port 3306 to the same port on your VM by executing the following command in your terminal:
After logging in to the server, execute the following command:
kubectl port-forward service/my-release-mysql-headless 3306:3306 -n data
You should see forwarding messages shown in the image below:
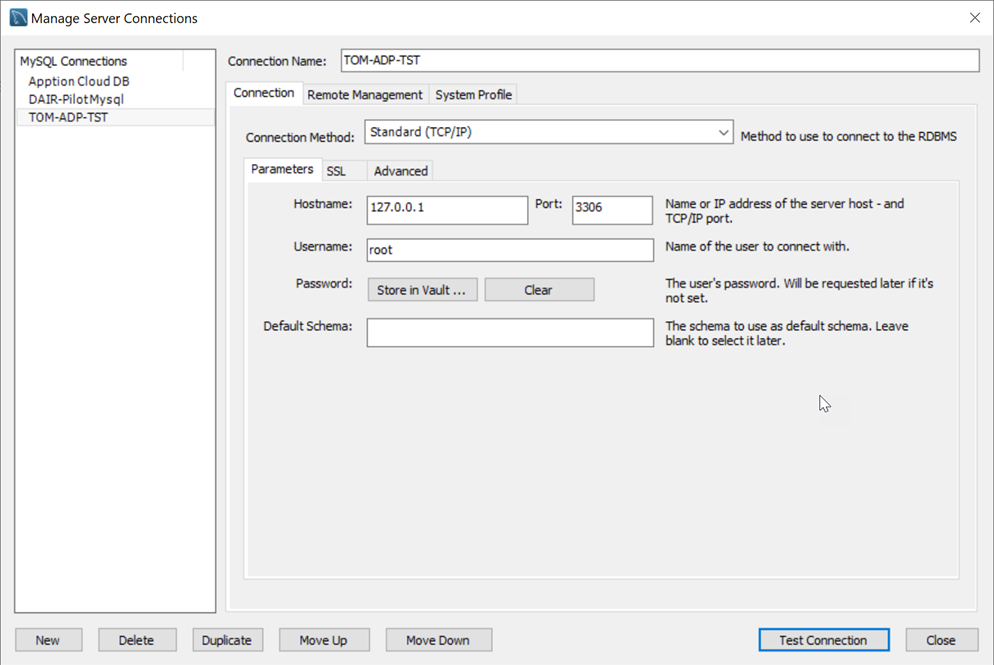
While port-forwarding is active, you can create a connection in your application and manage your database. Remember to enter ‘localhost’ as your host (port: 3306) and one of the following credentials:
Super admin privilege:
user: root
password: BoosterPack202!
Service account user with usage privilege on automated_data_pipelines database:
user: adp_serviceaccount
password: DAIRDBPass
Remember to change the default root password and/or the service account user for security reasons. To stop port-forwarding on your terminal, press Ctrl+C.
For a successful login to MySQL Workbench, add a new connection and test the connection (with account credentials noted above) from the Manage Connections screen:
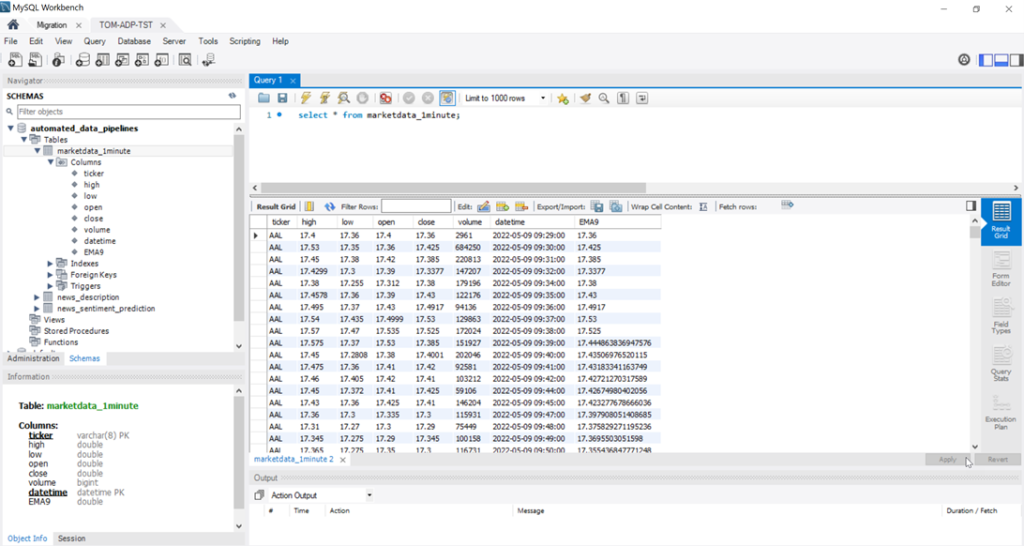
Once connected to the automated_data_pipelines database, you can query tables and manipulate the database like any other DBMS.
For example:
Analytics and Middle-tier Services APIs
The functionalities in analytics and middle-tier services are exposed via REST APIs, which allow scalability and flexibility. API calls are stateless, and each request is independent and needs to contain all the necessary information. These APIs – explained in the Flight Plan – can be accessed or tested using Redoc or Swagger interfaces. For example, the following image shows the Swagger interface for the news sentiment prediction API.
Below, you can find more information about each of the three APIs:
News Sentiment Prediction API
Returns the predicted sentiment of given news information.
How to access: {HOST_IP}:30602/docs OR {HOST_IP}:30602/redoc
Request: GET /news/description
Request body (refer to Polygon.io documentation on “Ticker News” API of some of these fields):
ticker: Stock symbol
title: News title
news_url: URL to the news article
news_content: content of the news
summary: summary of the news provided by the Polygon.io API
id: unique identifier in the news_description table in the solution database
datetime: news publisheddatetime with the format of “yyyy-mm-dd HH:MM.
News Description API
Returns the news sentiment prediction and description.
How to access: {HOST_IP}:30300/docs OR {HOST_IP}:30300/redoc
Request: GET /news/description
Request body
ticker: Stock symbol
day: Date format is yyyy-mm-dd
limit: the maximum number of news to be returned
skip: number of news to skip
Market Data API
Returns the one-minute market price data for the given date and ticker. If no date is given, it returns the data for the current day.
How to access: {HOST_IP}:30300/docs OR {HOST_IP}:30300/redoc
Request: GET /marketData/oneMinute
Request body
ticker: Stock symbol
date: Date format is yyyy-mm-dd
ADP Solution’s User Interface
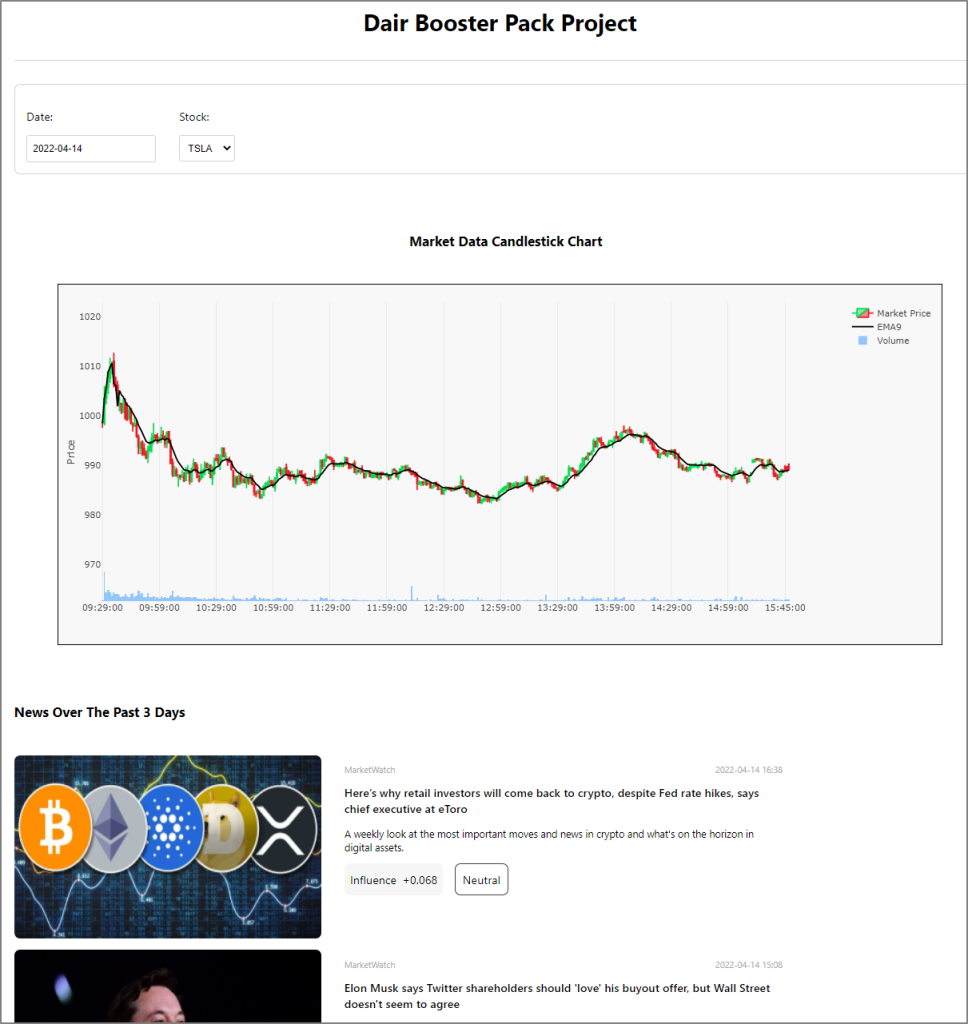
Finally, as the end point of the system, the solution’s outputs, including tickers’ candlestick prices, and related news are presented in a simple web UI. The webpage can be accessed from this URL:
{EXTERNAL_HOST_IP}:30333
The web application default page is automatically updated based on the selected Date and Stock dropdown. The ticker’s candlestick chart and the related news for the past three days will show. The sentiment prediction for each news item is presented as its numeric influence score and sentiment label [negative, neutral, or positive] below the news summary.
Note: Depending on whether the application is installed during US stock market hours, you may not see the chart or news until the US stock market re-opens the following day. As soon as new candlestick data or news for a specific ticker is saved in the DB, you should see the data displayed as shown below.
Termination
To terminate the solution and release any resources it consumes, return to the CloudFormation stacks page and delete the stack corresponding to the BoosterPack. More information about deleting a CloudFormation stack can be found here.
Factors to Consider
Alternate Deployment Options
This solution is deployed on a single-node Kubernetes cluster. For higher performance and availability in larger solutions, you may need to create multiple instances in your DAIR Cloud and set up a multi-node Kubernetes cluster. In that case, the cluster will have more resources from multiple instances to allocate to the solution pods and can re-allocate them to available instances (i.e., nodes) if any of them fails. However, in a multi-node cluster set up, it may not be practical to access services using NodePort as there will be different hosts where our pods and services get deployed. In a multi-node cluster, you would likely use NGINX ingress controller as described in the KAT BoosterPack and later in this section.
Managing a Kubernetes cluster for small solutions such as this Sample Solution may add unnecessary complexity and overhead, compared to using the same micro-services architecture on Docker Swarm. You may choose to install the tools and technologies included in this solution – Airflow, Kafka, Kafdrop, and MySQL using Docker – to reduce the cost and complexity. However, you will need to make changes in the configuration files of these tools to make it compatible with the solution. The source code for the ingestion, processing, analytics, middle-tier, and frontend services all require minor modifications.
Technology Alternatives
The technologies and tools in this solution were selected from popular open source technologies that integrated well together. These technologies can be replaced with other proprietary or open source tools, depending on your platform, skillset, and support needs. For example:
Item
Proprietary
Open source
Orchestration tools(Airflow alternatives)
Azure Data Factory
Kubeflow, Luigi, Argo, etc.
Streaming solutions(Kafka alternatives)
Azure Event Hubs
RabbitMQ, Amazon MQ, Redis
Data storage and management tools(MySQL alternatives)
Azure SQL
PostgreSQL, MariaDB
The presentation layer can be developed using other tools such as PowerBI, or full-stack development tools such as JavaScript, Node.js, Django, Ruby, etc.
Data and API Related Considerations
The main sources of data in this Sample Solution are:
The Sample Solution uses free subscriptions from these two data providers, but this comes with limitations. To use this solution beyond the purposes of demonstration and learning, you may need to subscribe to a higher-level plan. Please check the pricing information on the website of these two data providers. After subscribing to new plans, you need to update the related Airflow variables with your newly generated tokens, as explained earlier in Updating Finnhub and Polygon API keys.
This solution can be customized to automate the processes of ingesting, processing, storing, and presenting many types of data, like temperature, IoT, payment transactions, and so on.
To switch to other data sources, note the following:
Airflow pipelines
Ingestion pipelines call the APIs based on schedules defined in the definition of dag files and save the ingested data in the database or send it to a Kafka topic. Similarly, processing pipelines get triggered by schedules or a Kafka message and start to read and process ingested data. If you need to change the data type or data source, you may need to modify the source code for these pipelines, change dag files definition, or update general configuration parameters in this config file.
Table schema in the MySQL database
By switching to other data or data sources, you may need to change the database schema and adapt it to the API fields. You can use your preferred DBMS (e.g., MySQL workbench) for this purpose, as explained above.
APIs in the middle-tier
Middle-tier APIs are being called by frontend service and extract and return data from the database tables. By changing the data source and the database schema, you must modify the code and exposed signatures in this folder: Middle-tier source code
Analytics services
By changing the data type, you must replace the news sentiment model with your own model. The trained model in this application is based on TensorFlow framework. Depending on the framework used for your model(s) and type of data, you’ll need to make changes in the source code of this service as well.
Frontend design
The user interface in this Sample Solution is designed for demonstration. To change its design and/or its features, modify the frontend service source code.
Deployment
Finally, after customizing each of these services, re-deploy the service on the Kubernetes platform. Refer to ReadMe files for each service for the deployment guidelines (Airflow ReadMe, News Sentiment ReadMe, and Frontend ReadMe).
Security
The ADP Sample Solution is designed for demonstration purposes and can be used as a basic framework to speed up the development stage of your solution. This solution is not designed to be used in a production environment and several security measures and improvements are required to make it suitable for a production environment. The following points describe considerations to make it more secure:
Kubernetes cluster
To secure the Kubernetes cluster, refer to the recommendations in the KAT Sample Solution (“Security” section) and this part of the Kubernetes official documentation.
Ingestion and processing pipelines
Separating ingestion and processing pipelines in system architectures make your systems more secure by only exposing ingestion services to external data. While we have separated ingestion and processing pipelines in this Sample Solution, they are orchestrated using one single Airflow instance for simplicity and resource usage considerations. For higher security, you may want to use separate Airflow instances and customize the configuration of each instance accordingly.
For other considerations in securing Airflow and production deployment guidelines, please refer to the “Best Practices” section in this BoosterPack’s Flight Plan.
Passwords
There are several considerations regarding passwords for better security:
We have set default passwords for several tools and applications in this solution, such as Airflow and MySQL. Always change default passwords using your own strong passwords.
Some of the services in this solution are not password protected, e.g., analytics and middle-tier services. You can refer to this official document on how to secure these APIs.
For simplicity, most passwords in this solution are set in plain text config files or in the source code.
We recommend you use Kubernetes Secrets (or equivalent secrets vault) to store sensitive data such as passwords and tokens.
Images
Some of the pods in this solution pull public images from Intelius AI’s Docker Hub repositories. When building your own images after modifying each service, we recommend you make your own private repository (clone it). Refer to this documentation for necessary changes in order to pull images from a private registry.
Networking
For access convenience, most of the services in this solution are exposed as a NodePort. You must create firewall rules to allow access to these ports. You may consider different options such as using an ingress or load balancer based on your needs. Since the Kubernetes cluster created by this Sample Solution is based on the KAT solution, you may consider exposing these services using NGINX ingress controller for more flexibility or higher security. Remember, in this case you need to open an SSH tunnel on local port 8080 to open access to the Kubernetes dashboard.
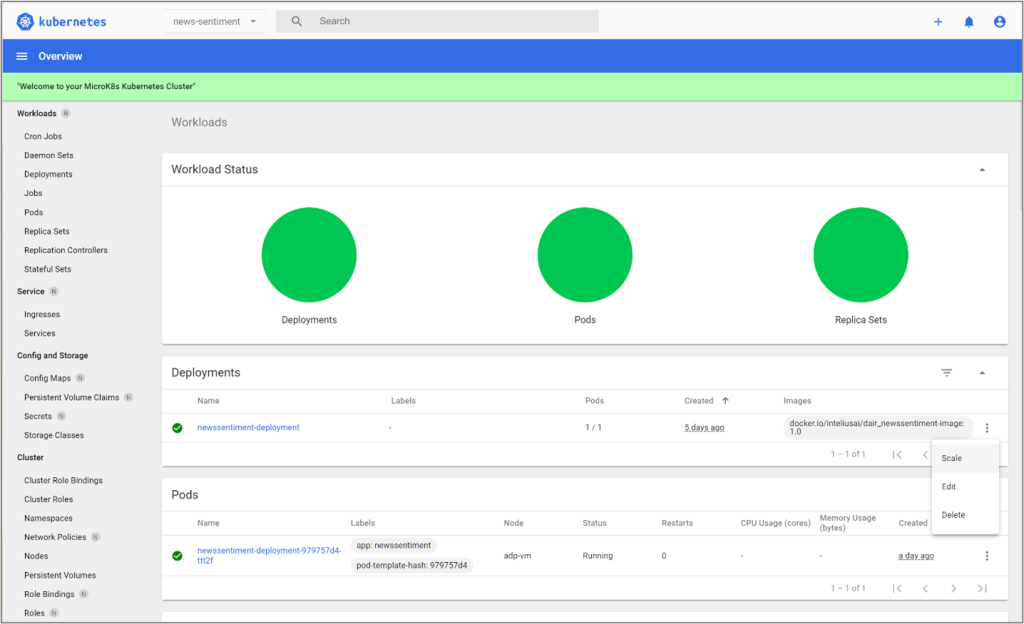
Scaling
Scaling in the ADP solution can be managed at different levels and components of the solution. For example, as noted in this documentation, you may consider using a multi-node Kubernetes cluster to provide more resources for the system and support scaling up. Kubernetes has several options for manual or automatic scale up or down. For example, you may scale up analytics and middle-tier services by increasing their number of pods. While this can be done in multiple ways, the following image shows how the news sentiment prediction can be configured manually using the Kubernetes dashboard.
To learn more about Kubernetes features for scaling, refer to the KAT BoosterPack documentation or this section of the Kubernetes official documentation, which explains Kubernetes horizontal pod scaling in detail.
You may also scale out the number of Airflow workers for parallel execution of its scheduled tasks. The Airflow instance in this solution is based on “Celery Executer”, which enables efficient processing of concurrent tasks on multiple workers. Each of these workers may be deployed on different nodes in a multi-node cluster. You can either manually increase the numbers of workers in Kubernetes dashboard or increase the value of the “workers.replicas” parameter in the Airflow helm configuration file (values.yaml) before installation. For information about how celery executors work, review the Airflow documentation.
Availability
One of the main advantages of Kubernetes is that it can create a highly available platform, with few, if any single points of failure. To achieve this, you need a good understanding of the architecture of Kubernetes.
To learn more, read these sections in the Kubernetes and MicroK8s official documentation:
In this solution, for example, implementing the recommendations to create a multi-node (or even a multi-master or multi-site) Kubernetes cluster or horizontal autoscaling of the pods also results in higher availability. You may create replicas of Airflow scheduler – but not necessarily for higher performance – for higher availability.
Finally, the recommendation to create a MySQL innoDB cluster in this solution’s Flight Plan can improve availability and fault tolerance in the system by creating replications of the MySQL databases.
Cost
One advantage of this solution is that all the integrated tools and technologies are open source and there are no licensing costs. However, as this solution needs to be adapted to your business needs, you may incur additional costs. For example, if this solution is going to be used on more tickers, you might upgrade your subscription plan on Finnhub.io or polygon.io or switch to other stock market data providers. Similarly, you may choose to use paid data sources. Substituting any of the technologies in this system with their proprietary alternative would also add cost.
The source code for this Sample Solution and detailed documentation are posted this public GitHub repository.
Glossary
The following terminology may be used throughout this document.
Term
Description
Link/sources
DAG
“Directed Acyclic Graphs – In mathematics, particularly graph theory and computer science, a directed acyclic graph is a directed graph with no directed cycles. That is, it consists of vertices and edges, with each edge directed from one vertex to another, such that following those directions will never form a closed loop.”
“A data pipeline is a means of moving data from one place (the source) to a destination (such as a data warehouse). Along the way, data is transformed and optimized, arriving in a state that can be analyzed and used to develop business insights.”
“A candlestick is a type of price chart used in technical analysis that displays the high, low, open, and closing prices of a security for a specific period.”
A service that predicts impact of news articles on a specific ticker by using natural language processing (NLP) or other text and linguistics techniques. This impact usually is labeled as positive, negative, and neutral based on a calculated numeric sentiment (influence) score.
This Kubernetes service type exposes the service on each Node’s IP at a static port (the NodePort). You’ll be able to contact the NodePort Service, from outside the cluster, by requesting <NodeIP>:<NodePort>.